Friday, August 31, 2007
Understanding LT's many versions
The following is a summary description of the many versions and what file formats they create:
AutoCAD/LT2007 and 2008 create R2007 DWG/DXF files.
AutoCAD/LT2004, 2005 and 2006 create R2004 DWG/DXF files.
AutoCAD/LT2000, 2000i and 2002 create R2000 DWG/DXF files.
AutoCAD LT97 and 98 create R14 DWG/DXF files.
AutoCAD LT95 create R13 DWG/DXF files.
AutoCAD LT V1 and V2 create R11/R12 DWG/DXF files.
Click HERE for Autodesk's free viewer and converter when you need to open files in older AutoCAD/LT versions.
For a list of changes from AutoCAD LT 2005 thru AutoCAD LT 2008, download the Release Comparison Matrix PDF file HERE. Web page summary HERE.
Watch the free LT2008 demo HERE.
Open and Browse the Lynn Allen LT2008 PDF file for tips HERE. ◦
Customizing LT's screen menu and toolbars
CUI command launches you into the customizing window that let's you change almost everything you see on screen in LT. The following free tutorials are LT2006 specific but the majority still applies to LT2007 and LT2008:
http://autodesk.blogs.com/between_the_lines/2005/05/autocad_2006_tu.html ◦
Customizing LT's screen menu and toolbars
Thursday, August 30, 2007
LT cursor movement not smooth
Tap the F9 key on your keyboard once and see if that helps: you may have turned on SNAP, explained in Help in LT if you don't know what that is.
Clean your mouse, especially if it's the older roller-ball type (or roller-ball trackball): and clean the roller guides too, build-up can also exhibit such behavior.
Replace the mouse and/or uninstall the mouse driver and let Windows run it to see if the problem goes away. ◦
LT cursor movement not smooth
Wednesday, August 29, 2007
Free Tools from Autodesk
http://www.autodesk.com/dwgtrueview
How about a free DWG/DXF/DWF/DGN/JT file format viewer that will allow a user to electronically comment on and/or measure content in those files and return to the file originator for an update:
http://www.autodesk.com/designreview ◦
Free Tools from Autodesk
LT locks up while using Trim, Extend or Hatch....
First, rule out the problem is the file by running RECOVER command (instead of OPEN) or AUDIT command if you are already in the file (remember to answer Yes to fix any errors found).
Another fix you can try is to turn off video card hardware acceleration in Windows: In WindowsXP for example, this is found in Control Panel> Appearance and Themes> Display> Settings Tab> Advanced Button> Troubleshoot Tab> Hardware Acceleration slider:
◦
LT locks up while using Trim, Extend or Hatch....
Abbreviations for LT commands
These are called Aliases, and you can create them by editing LT's PGP file and adding or deleting what you need as you need it. To access the file, click on LT's Tools Pulldown Menu, Customize selection, Edit Program Parameters.
You will be presented with a new pop-up, scroll down and match exactly the format to add your own abbreviations/Aliases:
When you are done, save and close this file. At the LT command line, type REINIT, select PGP File from the new pop-up, then click OK: this reloads the PGP file you just edited. Your changes are now available for use.
◦
Abbreviations for LT commands
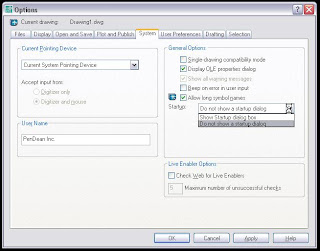
LT Startup dialog box
In LT2007 and lower, you need to start Options command, Select the System Tab, Startup section, use the pulldown for the desired startup method of your choice. Remember to click APPLY button then OK to set it.
In LT2008, you can use the STARTUP command, set it to O (zero) for no startup, or 1 (one) for the startup dialog box to appear. Explore it in HELP in LT2008. ◦
LT Startup dialog box
Autodesk Discussion Forums
Some other areas of interest to LT users appear at first to not exist, but they are just placed in some interesting locations.
For Print/Plot issues with LT, the ideal place to read or post is HERE.
For Dynamic Blocks issues with LT, the best discussion area to read or post is HERE.
For pointing devices (mouse or tablet) and displays (monitors), the discussion area is found HERE.
For Drafting Techniques, try this discussion area HERE.
Always remember to always include your LT version as a minimum when posting, include other relevant information bsed on where you post in as well (plotter/printer and driver in the Print/Plot, Mouse and mouse driver in the Pointing Devices areas etc.). ◦
Autodesk Discussion Forums
PDF file creation from LT
All you need is a PDF driver installed in Windows to PLOT to in AutoCAD, as well as the side perk of being able to Print to it from other programs like MSWord or MSExcel etc. to create PDF files too.
Free PDF drivers that work just fine in WindowsXP or higher are available through any internet search like this one, just click HERE.
If you have a problem with free, almost all of the vendors at the above link will sell you more advanced versions with more features and abilities. ◦
PDF file creation from LT
Insert a Raster Image File in LT
Simply open the Image file in another program/viewer, Select the entire image inside that program (if you cannot, you need another program/viewer application), then use Windows Copy/Paste ability to paste the image in LT.
For Raster Image files like JPEG or PNG or GIF, you can use Windows' own Paint program to do this. Make sure you do not insert the image on a layer set to no-plot.
Example: Open Windows Paint, using the File Pulldown menu in that program, open your raster image file. In the Edit Pulldown menu, use Select All to select the entire Image, then select Copy from the same pulldown menu.
Click over to LT, Select the Edit pulldown menu, Select Paste Special... (or type PASTESPEC) and select any Image or Picture selection that best meets your need, and continue with image placement.
The above method also works for PDFs (using any PDF Viewer with selection features similar to Windows Paint described above), TIFFs, Word/Excel and so many other programs. You are only limited by your imagination, the 'other' program's selection methods, and your choices of PASTESPEC command's pop-up. ◦
Insert a Raster Image File in LT
Tuesday, August 28, 2007
Setting a Viewport's Scale in a Layout
Open the Viewports toolbar (see previous posting here), select the viewport, then use the Viewports toolbar's pulldown menu to select a predefined scale. If needed, you can resize the viewport to better fit your view, and double-click inside the viewport to pan your view inside the viewport (be careful not to zoom, this will remove your viewport scale).
Don't forget to right-click the viewport and lock it so that the scale is never changed accidentally.
◦
Setting a Viewport's Scale in a Layout
Cannot Fillet and more: lines are non coplanar errors
LT is still AutoCAD, a 3D program that has a Z height elevation: those 2D commands require your lines to all be on the same Z height, ideally set to O (zero).
Create a new toolbar button on a toolbar (preferably a custom toolbar on your own), and add the following macro (ideally just cut and paste from here, watch out for word wrap):
^C^C_UCS;;_move _all;;0,0,1e99;;_move _all;;0,0,-1e99;;_chprop;_all;;_thickness;0;;^M;
Now click on the toolbar button you just created, and select the entities in question (or your entire drawing if needed). Make sure your UCS is set to World. This routine will not convert 3D objects in your file to 2D entities. ◦
Cannot Fillet and more: lines are non coplanar errors
Modelspace background color
Notice that you can change other colors of other display entities and areas there, spend a little time and adjust all items to meet your visual needs.
◦
Modelspace background color
Turn on a Toolbar
If you know the name of the toolbar, you can try using the -TOOLBAR command (note the dash): just type it at the command line and explore the options. You can also use this command to relocate a toolbar to mid-screen if for whatever reason you lost track of it: type F for float, and when prompted for position type 300,300 and that should place it in your drawing area to relocated. Explore this command in more depth in HELP in LT.
◦Turn on a Toolbar